Showing posts with label How To. Show all posts

Thursday, August 7, 2014

Creative Quilting with Thread Painting and Free Motion Techniques

Welcome fiber artist and quilter Karen Ponischil, owner of Karen Ponischil Design. Karen teaches thread painting and free-motion quilting at Mary Jo’s Cloth Store. To learn more about Karen, and to see examples of her work visit www.KarenPonischil.com


I have always loved creating with fabric and began sewing when I was a youngster. At first I made clothes for my dolls and as I gained more experience I began making my own clothes. I was given my first sewing machine for Christmas when I was twelve years old, and this began a life long love of sewing.  In 2001, I discovered art quilting which was my hobby until 2003 when I decided pursue it as a career. I create quilts using whole-cloth painting or raw edge appliqué. I then thread paint the quilt to bring it to life!

What is thread painting?

Thread is used on fabric like an artist uses pencil on paper, to add shadows, mid-tones and highlights. Thread “painting” makes an object look 3-dimensional by using different thread colors.  Below is an example of a ginkgo leaf design with and without thread painting. This is what you will learn in the introductory thread painting class that I teach at Mary Jo’s.  You can see how the stitching and threads create depth and texture to the fabric.

After mastering the basic techniques, you can take it to the next level by learning how multiple fabrics and greater detail in the advanced thread painting class where students learn to create the poppy flower design below.  Thread painting really brings the quilt to life, making it look more real and lifelike.


What is free-motion quilting?

Quilting also uses thread but the purpose is to hold 3 layers (top, batting and backing) together where thread painting is purely decorative. Quilting can be done by hand, on a domestic sewing machine or a long arm machine. Free-motion quilting is a technique where the feed dogs on the machine are set in the down position, so the quilt can be moved in any direction under the needle, and not just forward and backward.  This allows for greater creativity!


I love sharing my tricks, tips and techniques for sewing, quilting and thread painting with students.  It is such a fun and creative art that combines fabric, thread and design.  Join the fun and sign up for one of my classes today, by clicking here.

Monday, July 14, 2014

Make Pompom Decorations with Knit Fabric

Decorate for your next party with pretty and cheerful pompoms! You can make a variety of sizes and colors to match the holiday or your event. Make an assortment of red, white and blue pompoms for patriotic holidays, pink and blue for a baby shower or white and cream colors for a wedding.


Hang pompoms outside from tree limbs to create a festive landscape; a beautiful backdrop for wedding pictures; or use pompoms indoors, hanging over buffet tables or grouped in clusters to make a simple centerpiece.


Making knit fabric pompoms is easy.  Just follow the instructions below.  We would love to see how you use pompom decorations.  Please share your photos with us on Facebook.com/MaryJosClothStore or by tagging us on Instagram at @MaryJosClothStore!

Easy knit pompoms step-by-step:

To make pompoms you will need cardboard and strips of knit fabric like t-shirt material.  We used Knits by Riley Blake in hot pink and ITY Jersey Knit in a soft blush color.

http://maryjos.com/fabrics/knit-solids-k100-70-hot-pink-riley-blake 

http://maryjos.com/fabrics/ity-jersey-knit-pink-spandex-house

1. Make a template from cardboard to the size you would like. We used a small plastic tub for the outer circle and an aerosol can for the inside circle.  Cut a small pie shaped piece from the circle. This will create a “C” shaped template. Cut two the exact same size.


2. Using scissors or a rotary cutter and mat, cut knit fabric into long strips. Cut ½-inch to 1-inch wide pieces. You do not need to worry about measuring and cutting accurately; the strips do not need to be perfect.


3. Stack the two cardboard templates together and start wrapping knit fabric strips around the template.  Wrap it with an even tension but not tight. When one piece ends, overlap and start a new piece.


4. Continue wrapping knit fabric strips around until you have at least 4 layers.


5. Place the wrapped template flat on the work surface and place the palm of one hand on top while cutting around the edges with scissors.


6. Cut one strip of fabric to use as a tie.


7. Carefully separate the cardboard pieces, slip the tie in-between and tie tightly, cinching all the fabric strips together.


8. After the pompom is tied, remove the two pieces of cardboard.


9. Fluff the fabric and trim to make an even shape.


10. Continue to make more pompoms! You can create different sizes and colors, or alternate colors when wrapping the template to make a multi-color pompom.


Monday, June 23, 2014

The Classic Little Girls Dress

Welcome Carmen Baugh, co-owner of Three Maria Designs, an on-line clothing boutique offering quality, hand sewn designs for children. Carmen is a sewing instructor at Mary Jo’sCloth Store and shares her favorite style dress for little girls; the A-Line dress.


I was fortunate to be the recipient of my mother-in-law’s vintage patterns.  They were neatly stored in a closet along with her fabric stash.  Inside the box were two patterns for an A-Line jumper that dated back to the 1950’s and 1960’s.  The patterns were priced 25 cents and 45 cents respectively.  I knew then that the A-Line jumper was a true classic.  I have sewn hundreds of them for my daughters, nieces, great nieces, granddaughter, friends, and with students in sewing classes, and now for Three Maria Designs. 


My favorite pattern, which I have used for the past 5 years, is “Lucy” by Children’s Corner. I like this pattern because it is not stacked; with each size as a separate piece.  This means you do not have to trace the size you need.  The directions are clear and easy to follow and the pattern is true to size.

The A-Line dress is a simple and I look at it as a blank canvas.  It is perfect for monograms, appliqué, ric rac, lace, ruffles and piping. I have embellished A-Line dresses with a variety of themes such as birthday cakes, pumpkins, ghosts, Christmas trees, flowers, crabs, alligators, a jester hat and more.  You can be very creative! 


It is a fun dress that is easy to make and the fit is very forgiving.  It can be made as a summer jumper using seersucker fabric (my favorite) and for winter using corduroy and worn with a blouse or turtleneck.   I make my dresses fully lined with matching covered buttons and that is what students learn in my class.


If you are interested in learning how to make an A-Line dress, I will be teaching a class at Mary Jo’s Cloth Store on August 14 and August 21, 2014.  We will be making the A-Line Pumpkin Dress. I hope to see you there! Click here for more information.

Maria Carmen Baugh
Three Maria Designs

Visit Three Maria Designs to see more clothing for the best-dressed child at www.ThreeMariaDesigns.com and on Etsy at www.etsy.com/shop/ThreeMariaDesigns


Park Bench Club

Learn how to quilt in a hands on, personalized classroom setting with one of Mary Jo's top instructors, all while making a beautiful quilt to call your own. Starting August 16, try something new, and join Mary Jo's Park Bench Club! Space is limited, so call today and reserve your spot. Also be sure to take advantage of our 10% discount when you book with a friend.

Monday, June 2, 2014

Ten Tips for Ironing and Pressing

Next to the sewing machine, the iron is one of the most used tools when making quilts, garments or home décor. If you are doing anything with fabric, you are going to use an iron. 
Here are our favorite basic ironing and pressing tips:
1.    Iron with straight, back and forth strokes. Ironing with a circular motion can stretch out your fabrics.
2.    Wait for the iron to heat up completely before you use the steam feature. If the iron is not heated it could drip water on your materials.
3.    To iron embroidery, applique or other raised designs, cover your ironing board with a towel and lay the fabric face down, then iron.
4.    Regularly clean your iron to prevent marks on your materials, and for better performance. You can find hot iron cleaners in the notions department.

5.    Pressing is different than ironing. When ironing you are moving the iron back and forth, to press you will lift the iron up and put it back down. Pressing will prevent the fabrics from stretching.
6.    Use a press cloth to prevent creating shiny spots on the material.
7.    Press seams in garments from the right side of the fabric, with the iron running parallel to the straight of grain to avoid pressing tucks into the seam.
8.    Press bias seams with the iron at an angle to the seam so that you are pressing along the straight of grain. This will help to prevent stretching.
9.    To hold pleats in place while ironing or pressing, use paper clips or clothespins.
10.  Test your iron settings on a small scrap of fabric, or in an inconspicuous place to make sure the fabric can accept heat and steam.
      If you would like to learn more about irons, and ironing equipment we recommend this video from Threads Magazine “Pressing Equipment 101” 


Wednesday, May 28, 2014

7 Steps To Dress Your Window Like a Pro

Dress Your Window with Elegant Silk Curtains


Are you looking for an elegant style of curtains that you can make yourself, for a special window in your home?  This beautiful curtain features a smocked top heading, created with fabric, lining and gathering tape available in the home décor area at Mary Jo’s Cloth Store. A purple silk fabric worked up beautifully for this style with hand stitched glass beads for even more glamour!

Gathering tapes are a great way to create curtains or valances. To use shirring tapes, finish your curtain or valance allowing for a double fold of material on the reverse side at the top. For silk or other thin fabrics, be sure to add lining material for added body. You will need 2 ½ to 3 times fullness across the width of the flat, finished curtain.


After the curtain panel is finished, pin the shirring tape on the reverse side, and machine stitch using a thread that matches the face fabric. You can drop the tape down from the top to create a ruffle like shown, or line it up even along the top.


Sew the tape to the curtain using a matching thread. Depending on the tape you are using, you will need to stitch two or more times across the top. Be careful not to stitch across the gathering cords that are woven into the tape!


After it is sewn, fish out the shirring cords on one end and tie securely. On the opposite side, fish out the cords, tie and pull to gather the curtain to the desired fullness.


The specific tape used on this curtain gives a diamond-smocking appearance. 


To enhance the appearance of the smocking, it may need to be hand-stitched at the top, bottom and center of the gathers. On this curtain, small glass beads were added to accent the stitching.


To install the curtain on the hardware, insert pin hooks by stabbing them into the back of the gathering tape, spaced about 4 inches apart. You will find the pin hooks and a wide assortment of high quality drapery poles, finials and brackets in the drapery hardware area at Mary Jo’s. 


Monday, March 17, 2014

Recycle Old Blue Jeans into a Fun Apron

Before you throw that old pair of jeans in the trash, take a look at this easy project that will turn your trash into a treasure!  Make a cute apron from old blue jeans!


This apron is perfect to wear in the kitchen, but the deep jeans pockets are handy for keeping tools at your fingertips in the garden or art studio.  If you want to make a more masculine version, omit the ruffles and choose a solid or striped fabric for the ties and binding.

We found inspiration for making this project from the Creative Green Living website, which has a wonderful tutorial for making what they call a “Cowgirl Apron”. http://www.creativegreenliving.com/2013/04/farm-girl-apron-tutorial-from-recycled.html

Here are our step-by-step photos – it’s a fun project!  We hope you enjoy turning trash into treasure by making your own blue jeans apron.


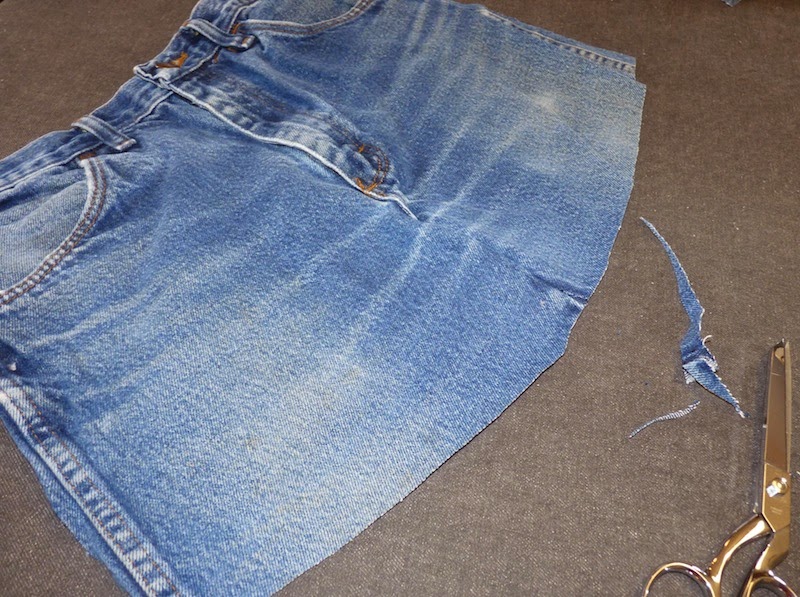
Cut off the legs of your old blue jeans.


Cut away the seat from the front along the seams.


Mark a straight line from the crotch to the bottom and sew along the mark.


Cut off the bottom to make a curved, apron shape.


Split open one of the leg pieces and use the hem of the leg as the top edge of the apron.  Trim off excess  at the bottom to match the waistband on the bottom section, allowing an inch extra for sewing them together.


Cut away on each side of the top section for a better fit around arms.  To figure out the fit, pin the top and bottom pieces together and hold it up to your chest and mark a curved line.


Cut off one of the back pockets and sew to the center of the top section.


Make ties from a cute fabric and pin on each side of the waistband.


Make ruffles and sew around the bottom section.  Our ruffles are made 1 ½ inches wide.


Sew the top to the bottom, topstitching along the waistband.


Make a fabric binding and sew it around the cut edges of the top section of the apron, allowing enough binding to continue topstitching past the top, as ties for around the neck.


Cut a piece of fabric to line the bottom section.  Sew around the edges and turn right sides out.  Turn under the fabric at the top edge, pin and sew.


Your blue jeans apron is finished!