Showing posts with label cloth. Show all posts

Thursday, August 7, 2014

Creative Quilting with Thread Painting and Free Motion Techniques

Welcome fiber artist and quilter Karen Ponischil, owner of Karen Ponischil Design. Karen teaches thread painting and free-motion quilting at Mary Jo’s Cloth Store. To learn more about Karen, and to see examples of her work visit www.KarenPonischil.com


I have always loved creating with fabric and began sewing when I was a youngster. At first I made clothes for my dolls and as I gained more experience I began making my own clothes. I was given my first sewing machine for Christmas when I was twelve years old, and this began a life long love of sewing.  In 2001, I discovered art quilting which was my hobby until 2003 when I decided pursue it as a career. I create quilts using whole-cloth painting or raw edge appliqué. I then thread paint the quilt to bring it to life!

What is thread painting?

Thread is used on fabric like an artist uses pencil on paper, to add shadows, mid-tones and highlights. Thread “painting” makes an object look 3-dimensional by using different thread colors.  Below is an example of a ginkgo leaf design with and without thread painting. This is what you will learn in the introductory thread painting class that I teach at Mary Jo’s.  You can see how the stitching and threads create depth and texture to the fabric.

After mastering the basic techniques, you can take it to the next level by learning how multiple fabrics and greater detail in the advanced thread painting class where students learn to create the poppy flower design below.  Thread painting really brings the quilt to life, making it look more real and lifelike.


What is free-motion quilting?

Quilting also uses thread but the purpose is to hold 3 layers (top, batting and backing) together where thread painting is purely decorative. Quilting can be done by hand, on a domestic sewing machine or a long arm machine. Free-motion quilting is a technique where the feed dogs on the machine are set in the down position, so the quilt can be moved in any direction under the needle, and not just forward and backward.  This allows for greater creativity!


I love sharing my tricks, tips and techniques for sewing, quilting and thread painting with students.  It is such a fun and creative art that combines fabric, thread and design.  Join the fun and sign up for one of my classes today, by clicking here.

Monday, June 16, 2014

A quick and easy patriotic DIY for the 4th of July


Banners and pennants make festive decorations for inside or outside your home. If you are planning a July 4th or Labor Day party, the red, white and blue banners are the perfect accent for a patriotic theme!

You can easily make banners using Riley Blake fabric panels available from Mary Jo’s Cloth Store. Each 24 x 44 inch panel is printed with seasonal colors and patterns on cotton fabric and is ready to cut and sew. Complimentary fabrics are available for making tablecloths, napkins, placemats and other decorations.

Follow the steps below to make banners for your next celebration!


Each panel will make a banner that is about 60 inches long. Purchase additional panels for larger banners. You can tie them together, or make them as one long piece. Two panels were used for the banner shown here.


Using a rotary cutter and mat, or scissors, cut apart the pieces, cutting along the edge of the printed triangles, and the long strips. You will have matching front and back pieces.


Attach medium weight fusible interfacing to the back of half of the triangle pieces using an iron. Make sure to keep the pieces in matching pairs, adding interfacing to one piece of each pair.


Place each matching triangle piece face to face and sew around the long edges using a ¼-inch seam allowance.  Turn right sides out and press the edges.


Sew together the long strips and sew the top edge of each banner to the strip, using a ¼-inch seam allowance. Leave a tail at each end, and sew all the banners in a row, alternating the colors and patterns.


Press the strip from the front, fold over and topstitch. Your banner is finished and ready to hang. Welcome to the party!


To purchase your own banners, or for more information click here.

Monday, June 2, 2014

Ten Tips for Ironing and Pressing

Next to the sewing machine, the iron is one of the most used tools when making quilts, garments or home décor. If you are doing anything with fabric, you are going to use an iron. 
Here are our favorite basic ironing and pressing tips:
1.    Iron with straight, back and forth strokes. Ironing with a circular motion can stretch out your fabrics.
2.    Wait for the iron to heat up completely before you use the steam feature. If the iron is not heated it could drip water on your materials.
3.    To iron embroidery, applique or other raised designs, cover your ironing board with a towel and lay the fabric face down, then iron.
4.    Regularly clean your iron to prevent marks on your materials, and for better performance. You can find hot iron cleaners in the notions department.

5.    Pressing is different than ironing. When ironing you are moving the iron back and forth, to press you will lift the iron up and put it back down. Pressing will prevent the fabrics from stretching.
6.    Use a press cloth to prevent creating shiny spots on the material.
7.    Press seams in garments from the right side of the fabric, with the iron running parallel to the straight of grain to avoid pressing tucks into the seam.
8.    Press bias seams with the iron at an angle to the seam so that you are pressing along the straight of grain. This will help to prevent stretching.
9.    To hold pleats in place while ironing or pressing, use paper clips or clothespins.
10.  Test your iron settings on a small scrap of fabric, or in an inconspicuous place to make sure the fabric can accept heat and steam.
      If you would like to learn more about irons, and ironing equipment we recommend this video from Threads Magazine “Pressing Equipment 101” 


Tuesday, May 6, 2014

Pretty Purse Tissue Pack

 This pretty tissue pack cover is so much fun, you will want to make a few for yourself and a few more to share with friends or family.  We used a cute cotton polka-dot fabric, which is bright and cheerful.

Are you planning a wedding?  Make a tissue pack cover for each of your bridesmaids and the mothers, using scraps of fabric from the dresses or wedding decor – you know somebody will need tissues! 

Step-by-step:

1. Cut two pieces of fabric 6 inches x 7 inches.  Cut two pieces of narrow elastic 3 inches.  Along one of the short sides, on one piece of fabric, secure the elastic (folded to form a loop) inset 2 inches from each end.  Use painters tape to old the elastic loop in place.  


2. Place the two pieced of fabric face to face and sew along the short sides using a ¼-inch seam allowance.  Backstitch over the elastic pieces, to make sure they are sewn securely.  Turn right sides out and press with an iron.


3. Topstitch along each sewn edge, inset ¼-inch from the edges.  Fold the sewn edges together, meeting in the middle and pin each end to hold in place. 


4. Sew across the end using a ¼-inch seam allowance.


5. Flatten out each end and mark 1/2inch from each corner and pin to hold in place.


6. Sew each corner, keeping the seam allowance facing in the same direction.  This will create a box shape. 


7. Turn right sides out and sew a button opposite each loop of elastic. Insert tissues and loop the elastic around the buttons. 


Tuesday, April 29, 2014

Don't forget about Mom this Mother's Day

Going on now until May 10, treat Mom to the special day she deserves at Mary Jo's! Enjoy crazy deals on Baby Lock sewing machines and serger machines, $5 in MJ Bucks for every $25 you spend on gift cards as well as 'must have' hobby tables!

Get to Know Your Instructor

Part 1

Here at Mary Jo's Cloth Store, we consider ourselves family. In that same spirit, we decided it was time to introduce our family to yours! Take a few minutes and get to know our instructors, aka the 'Sew Sistas', on a personal level.

Sew Sistas Q&A with Mary Sue Christenbury

Birthday: January 16

Can you tell us a little about your life story?
I was born in Summerville, SC. Graduated from Clemson University with a BS in Marketing. I also have CE credits from Greenville Technical College in Pattern Design and CE credits in Sign Language I, II, and III.  

After college, I worked as a manager for Uptons in Greenville, SC. My family relocated to NC in 1992 and have lived here ever since.

Currently I have many jobs. Through high school, I worked in retail and when I was in college.Since that time, I have taught in a private Christian school, been a teacher’s assistant in the public school system, and a substitute interpreter for the deaf and hearing impaired. I currently am the CFO for Kings Mountain Crisis Ministry and own a home based screen embroidery, sewing and screen printing business. I also do minor home repairs, painting, pressure washing, and cleaning or whatever else needs to be done.

How did your love affair with sewing come to be?
I’ve been sewing since I was 11 years old. It was very difficult for me to find clothes that were tall and that fit properly, so I started sewing. A very sweet lady from our church came over to my house for about an hour or so and showed me a few things and I’ve been sewing ever since.

What is your favorite project?
My favorite sewing projects are ‘one of a kind’ items. For example: Custom Designed & Embroidered Window Treatments, Wedding Dresses, Bedroom Ensembles, Custom Embroidered Reupholstered Furniture, and Original Dresses.

What is your favorite class to teach?
I enjoy teaching Sewing Concepts and Pattern Drafting. Both classes present their own set of challenges, but I truly enjoy sharing and teaching what I know and seeing the results when someone is amazed at how it all comes together. I truly enjoy the facet that students can take and use the information learned in these classes and apply it to any sewing or designing project.

If you could have any superpower in the world what would it be?
I think my ‘super power’ would be making people smile even when they don’t feel like it. We’ve all heard, ‘if your happy, notify your face.” Well, I believe that we should smile at people every day. You never know what people are going through and what a difference you can make with a simple smile. A simple smile is good for others around you, but it may also change your attitude as well. So SMILE!

Get your smile on with Mary Sue in her Pattern Drafting class this month.

Class: Pattern Drafting
When: Tues May 13, 6pm - 9 pm Description: Learn how to take exact body measurements and make a Body Glove Pattern out of muslin. Learn to cut & spread body glove to make a pattern that fits you perfect. Adapt body glove to make your own Pattern. Fee: $100

Please call the store at 704-861-9100 to reserve your spot today!

Tuesday, April 15, 2014

Understanding Fabric Dye Lots

When you visit our store you will find a lot of fabric!  Yes, we love fabric and try to keep a wide selection for our customers.   Our hope is that you find the perfect fabric for your quilting, garment and home décor projects! 

Sometimes the fabric is “perfect” because of the color.  You may have purchased twenty-five yards of a beautiful damask fabric for new curtains because it was just the right shade of yellow, but when you returned several months later to purchase more fabric to slipcover a chair it didn't match.  How can this be?  It is the same fabric!

An example of cuttings of the same fabric from three different dye lots


What happened is the new bolt and the old bolt were from different dye lots. A good explanation of dye lots can be found in the book Textiles: Fabrics, Application and Historic Style by Karla J. Nielson. 

“One batch of dye solution is referred to as a job lot or dye lot, and the dyed or printed textiles within that dye lot are exactly the same.  When subsequent batches are mixed according to the master or standard formula, they may be slightly different.  This means that a set piece-goods bolt may be just off from the standard, and a precise match may be impossible”.

For this reason it is always best practice to purchase all the fabric you will need at once.  Never assume you will be able to buy more of the same fabric later.  If you do return to our store, looking for additional yardage of the same fabric, bring a cutting of the original fabric to compare. 

The dye lots of this chevron fabric are slightly different, one is darker than the other
This applies to all types of fabric from quilting to upholstery – dye lots can vary slightly or a great deal.  The good news is that this is not a common problem, but one that should be considered as you plan your next sewing project.


Wednesday, March 5, 2014

Renew Chairs with Slipcovers


Slipcovers are a great way to update and renew a chair, without tearing off old fabric or adding staples and tacks, which can be time consuming and messy.  If you are not planning to reupholster your chairs, think about making a slipcover instead.

Simple slipcovers are practical for homes with pets and children because they can be removed and washed.  If you plan to make slipcovers, pre-wash the fabrics before sewing, and serge all the seams so that they will be more washer-friendly.

Museums use slipcovers to protect original textiles and padding while still allowing the furniture to be on display. 
  
One of the current trends in dining room décor is a skirted chair.  You will see this in decorating magazines and websites with gathered, or tailored pleats along the bottom of the chair seats. A skirted slipcover is also perfect for side chairs at a desk or vanity.

Here is a look at a slipcover being sewn from start to finish.  This slipcover has a ruffled skirt to compliment the ribbon print fabric.
Begin by making a pattern of the chair seat using paper or a remnant of fabric.


Use the pattern to cut the fabric, centering the motif and adding seam allowances.  Cut another piece for the back (which can be a plain fabric).  Cut the boxing strips, which are the pieces that will connect the chair seat to the skirt.  For this chair the boxing strips are cut 3 ½ inches, for a finished boxing of 2 ½ inches using ½ inch seam allowances.  Two pieces are cut – one for the front and one to line the inside.


Tip: To match the boxing strip to the top seat section, use an iron-on tape to secure the fabric at the center-front before sewing.   The boxing strip will not match around the sides.

Cut the ruffle pieces.  Measure on your chair to determine how long you would like the ruffle to be.  Allow two times fullness for gathering.  For this chair, two pieces were cut at 11 inches.  Sew the pieces together, fold in half and iron.  Gather the top edge to fit around the chair seat.  Assemble the parts by sewing the boxing strip to the top piece, and the ruffle to the bottom of the boxing piece. 
Cut four pieces 4 inches x 19 inches for the ties.  Fold in half lengthwise, right sides together and sew down the side and across the bottom and turn right sides out.  Iron the ties and pin in place.  Fold skirt and ties to the front and pin the back piece around the edges.  Sew together, making sure the skirt and ties do not get caught in the seam.

Turn right sides out.  If needed, add batting or foam to create a softer seat and then hand stitch the opening closed.

Tuesday, February 18, 2014

Calling All Home Schoolers

Want to learn how to sew? Our new class, Fun for Kids starts Monday, March 3 from 2 pm to 4 pm. Learn how to master the art of sewing, while having fun! From creating your very own pillowcase to design your own tote bag, each week is an exciting new project.

Date: Mondays in March
Time: 2 pm to 4 pm
Fee: $25 plus supplies (per class)
Instructor: Melanie Stiwalt
Ages: 9 years and up
only 6 available seats

Please contact Aimee Griffin at aimeeg@maryjos.com for more details or to sign up today!


Wednesday, February 5, 2014

Our Valentine to You!

Love sewing - you will love sewing even more with this heart shaped pincushion

If you quilt, make clothing, sew curtains or work on crafts you probably use pins.  Even people who do not sew will keep a few pins around the house, and most likely stored in a pincushion.

Pins come in a wide variety of sizes and styles.  From multi-use to pins specifically for applique, sequins, patchwork and sewing with silk.  Pins can be long or short with plain, plastic or glass ball heads and there are even flower-shaped head pins.


Because there are so many pins for different purposes, it is a great idea to keep several pincushions designated for each pin style in your sewing studio.  

Using a pincushion keeps your pins organized, neat and safe from falling to the floor, and the life of your pins by keeping the ends clean and sharp.


Here is a cute idea for making a heart shaped pin cushion for your sewing studio, or as a gift to share with sewing friends and loved one’s.  Tuck a heart shaped pincushion into a gift bag with a new box of pins and a pair of scissors or snips and you have just created the perfect Valentines gift!


Cut a triangle of fabric.  Red felt was used for this example with the triangle cut 9 inches on each side of the right angle (an isosceles triangle).  Cut two pieces of ribbon 9 inches each, and pin one piece of ribbon at each point at the bottom as shown. You can cut the triangle larger or smaller to change the finished size of the pincushion.


Fold over the top of the triangle along the right angle to the bottom corner.  Pin the edges together.


Sew along the two cut sides using a ¼-inch seam allowance.  You do not need to sew along the folded edge.  Leave a small opening along the side between the pieces of ribbon for turning.


Turn your heart pincushion right sides out and press with an iron.


Fill the pincushion. You can use a variety of fillers such as fine sand, crushed walnut shells (available at pet supply stores), bran, flax seeds or emery powder. 


After the pincushion is filled, sew the opening closed.


Bring the two ribbons together and tie a knot, and then tie a bow.  Your heart shaped pincushion is finished!


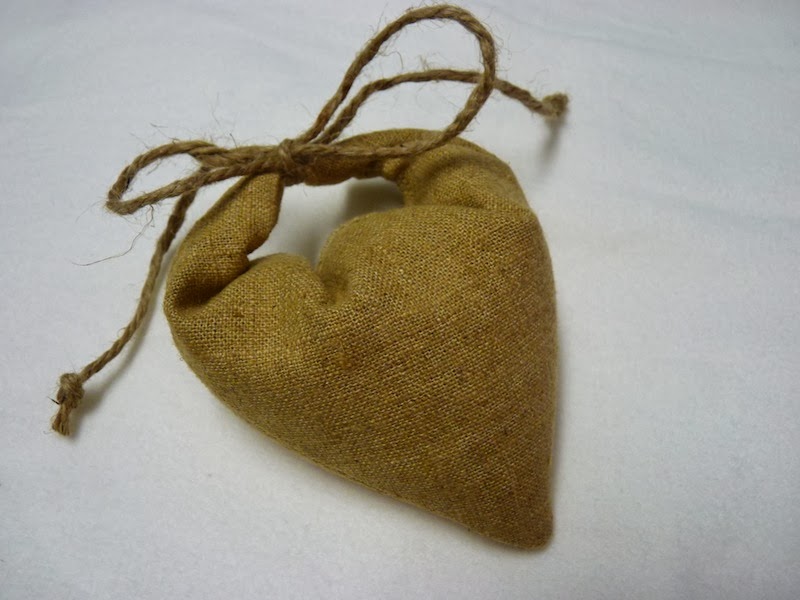
Here are some other heart shaped pincushions made from linen with jute twine, and cotton quilting fabrics.  You could also use velvet or wool.


We hope you enjoy making heart shaped pincushions.  Happy Valentines Day from all of us at Mary Jo’s Cloth Store!